
Course

Freeride ski & snowboard · venue inspection
Facecast User Course
Read a face, draw your lines, score them, compare the risk and commit. Use the language buttons at the top of the menu to read this course in English, Spanish, French, German or Italian.
Start here
Welcome & the Facecast method
Facecast is a decision tool for skiers and snowboarders preparing to ride a big-mountain face. Face inspection is the work you do before you drop in: study the face, map the cliffs, drops and runouts, and pick the line you will actually ride. Facecast turns that work into a clear, side-by-side view of your line options, their exposure and their commitment.
The method: four verbs, one workflow
Every inspection follows the same four steps. The whole course is organised around them.
Who this course is for
This is the complete user course. Everyone can read the Rider and Coach content; the Admin section appears only if you open the course while signed in as a site administrator.
- Rider — covers both Free and Pro: inspect faces, draw and score lines, save, share and publish. Anything that needs Pro is marked with a Pro badge.
- Coach — everything a rider does, plus the coach profile, the directory, promo codes and the coach subscription.
- Admin — the administration module (plans, pricing, PayPal, directories), shown only to site administrators.
How to use this course
- Switch language with the buttons at the top of the menu (English, Español, Français, Deutsch, Italiano).
- Use the menu to jump to any module. First-timers should read in order.
- A Pro badge marks anything that requires the Pro plan.
Module 1 · Everyone
Getting started
Create an account, understand the three plans, and learn your way around the inspection editor.
1. Create an account & log in
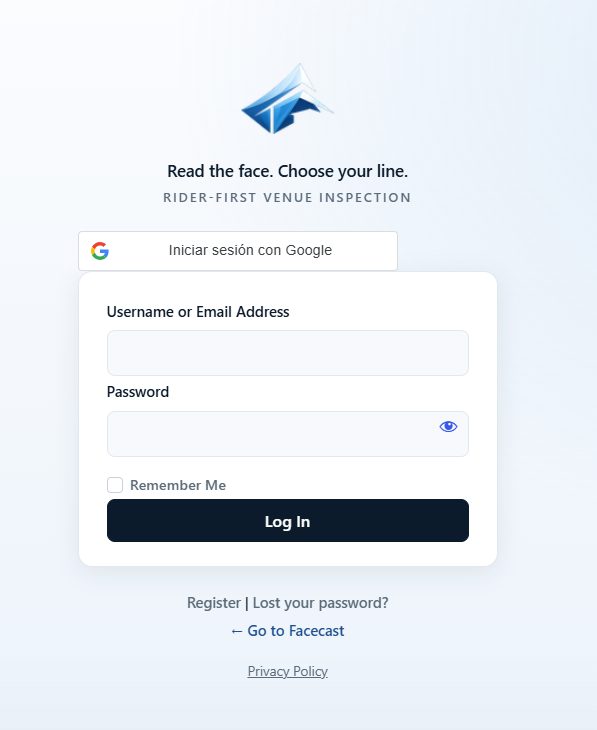
Facecast runs on the site's standard account system. Register or sign in from the site's login page. You must be logged in to open the editor — visitors who are not logged in see the message “You must log in to use Facecast.”
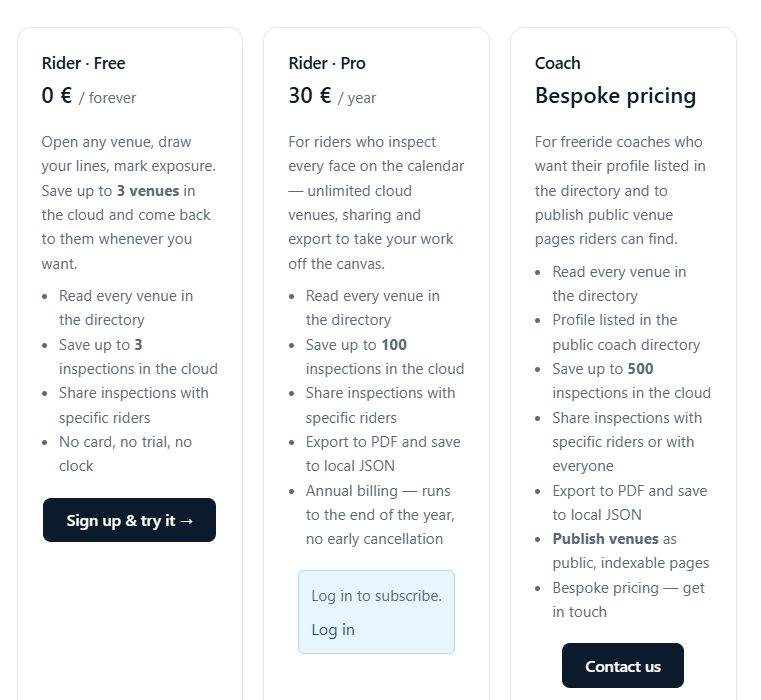
2. The three plans
| Capability | Free | Pro | Coach |
|---|---|---|---|
| Price | 0 € | 30 € / year | Bespoke pricing |
| Cloud-saved inspections | 3 | 50 | 100 |
| Share with specific riders | Yes | Yes | Yes |
| Share with all riders | — | — | Yes |
| Export PDF / JSON | — | Yes | Yes |
| Publish public venue pages | — | — | Yes |
| Public profile in a directory | Rider profile | Rider profile | Coach directory |
| Generate promo codes | — | — | Yes (monthly quota) |
3. Open the editor
The editor lives on the Inspect page. Click Start facecasting from the home page or open https://facecast.online/inspect/ directly.
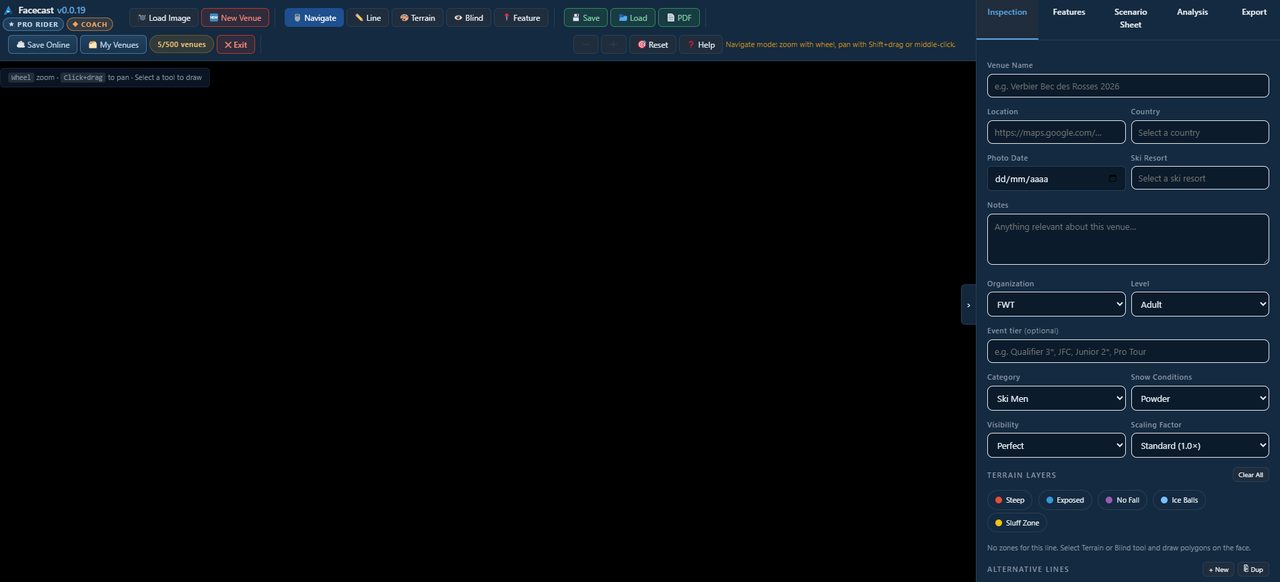
4. The editor at a glance
The editor has three areas:
- Toolbar (top) — grouped buttons: load image, the four drawing tools, file operations, cloud & sharing, and view controls. Your plan badges (Free/Pro/Coach) and your quota chip appear here too.
- Canvas (centre) — the face photo with four stacked layers: image, terrain, lines and annotations.
- Sidebar (right) — five tabs: Inspection, Features, Scenario Sheet, Analysis and Export.
Module 2 · Read
Read — inspect the face
The first verb. Load a photo of the face, set the venue details, then mark the terrain and the blind spots so every later decision sits on top of what the snow is actually doing.
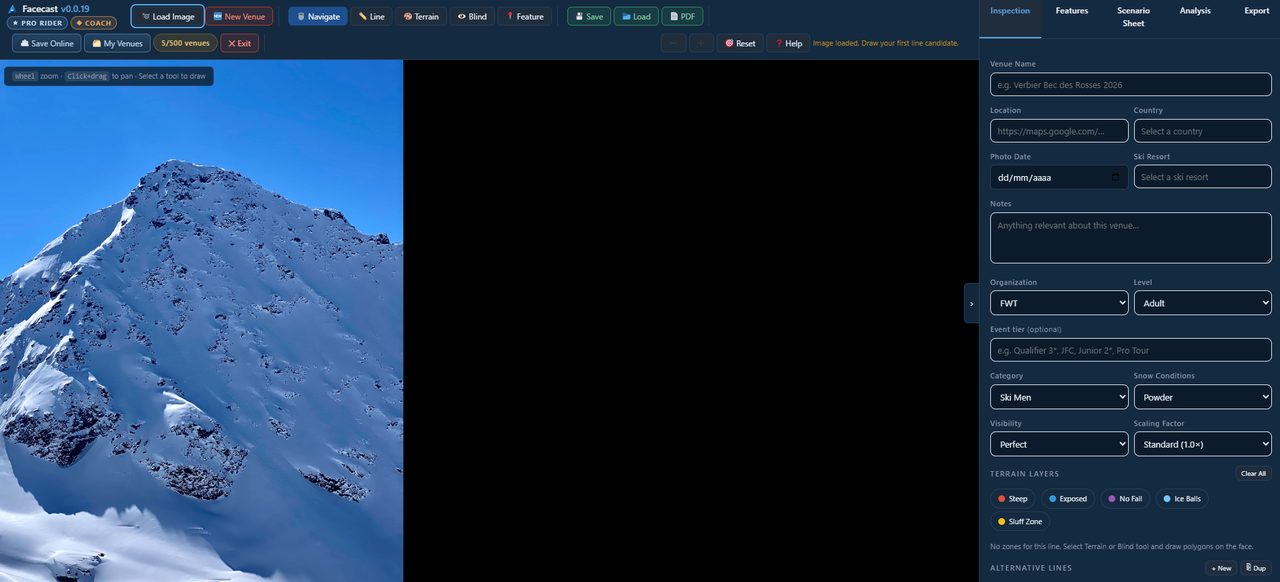
1. Load the face image
- Click 📷 Load Image and pick a JPG or PNG of the face from your device.
- The photo appears on the canvas. The status line changes from “Load a face image to begin”.
- Use the mouse wheel to zoom and the Navigate tool to pan. 🎯 Reset returns to the full view.
2. Fill in the venue details
On the Inspection tab, complete the venue meta so the inspection is findable and dated:
| Field | What to enter |
|---|---|
| Venue Name | e.g. Verbier Bec des Rosses 2026 |
| Location | A map link (e.g. Google Maps). An ↗ button opens it in a new tab. |
| Country | Pick from the list; it filters the resort list. |
| Photo Date | The day the photo was taken — snow changes fast. |
| Ski Resort | Pick from the list (filtered by country). |
| Notes | Free text: aspect, wind loading, anything worth remembering. |
3. Mark the terrain (hazard zones)
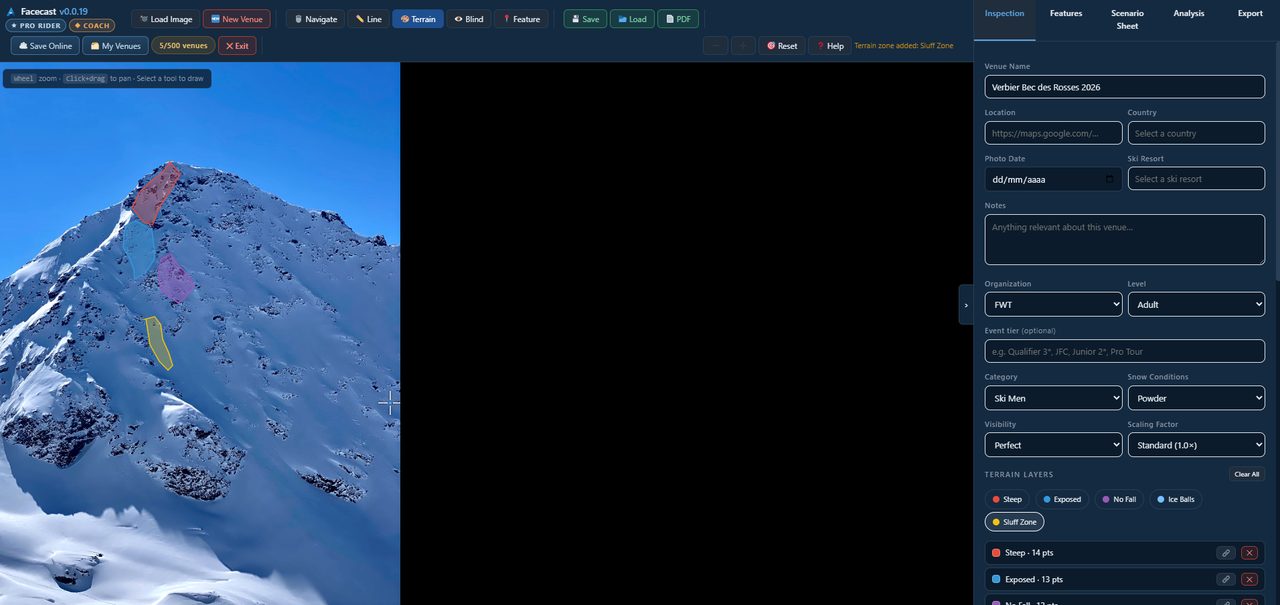
Select the 🎨 Terrain tool, choose a terrain type from the chips, then click-and-drag on the face to shade that zone. Right-click a zone to delete it; double-click to edit it. Clear All removes every zone.
| Terrain type | Meaning |
|---|---|
| Steep | Sustained steep pitch. |
| Exposed | A fall carries real consequence. |
| No Fall | A fall here is not survivable terrain — do not fall. |
| Ice Balls | Refrozen debris / icy chunder. |
| Sluff Zone | Where loose snow will run and pile. |
4. Mark blind spots
Select the 👁 Blind tool and shade the parts of the face you cannot see from the bottom before you drop in — rollovers, the back of a spine, anything you would have to commit to without eyes on it. Blind spots raise a line's risk in the analysis, so be honest about them.
Module 3 · Anticipate
Anticipate — draw lines & tag features
The second verb. Draw the lines you are considering, then tag the features — the cliffs, mandatory airs and technical sections — that each line has to deal with.
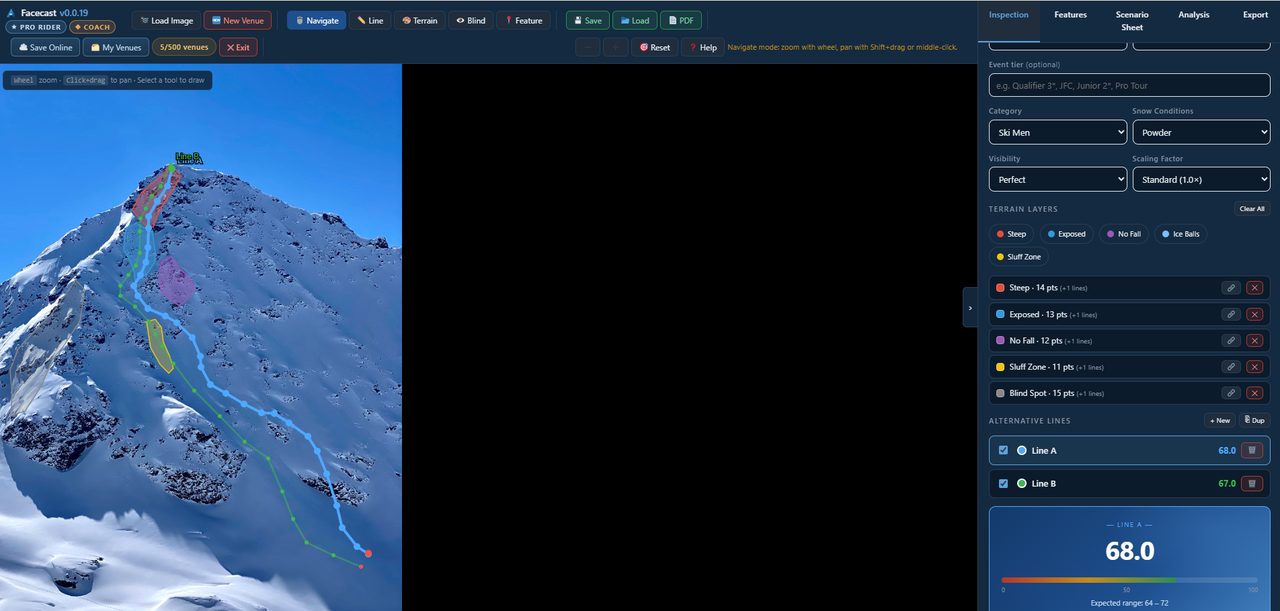
1. Draw a line
- In the Alternative Lines section, a blank Line 1 already exists. Use + New to add another or ⎈ Dup to duplicate the active one.
- Select the ✏️ Line tool and click on the face to drop waypoints from the drop-in down to the runout.
- Right-click to remove the last waypoint. Each line gets its own colour so you can tell them apart.
2. Tag a feature
Select the 📍 Feature tool and click on the line where the feature is. The Tag Feature dialog opens. Choose the type:
- Cliff / Air drop — a free-fall air.
- Mandatory air (forced) — a jump the line cannot avoid.
- Pillow — a smaller cushioned drop.
- Couloir / Narrow — a tight technical corridor.
- Technical turn section — demands precise, controlled turns.
For airs (cliff / mandatory / pillow)
| Field | Options |
|---|---|
| Height (m) | 1–40, in 0.5 m steps. |
| Landing | Flat / easy · Steep · Steep + exposed · Flat landing (penalty). |
| Trick | Straight · Spins (180–1080) · Flips · Off-axis / Cork · Rodeo · Double cork. |
| Modifiers | Grab · Switch take-off · Switch landing · First time in comp. |
| Inverted | Feet above head — can be a DQ in some rulesets (see Module 4). |
| Execution | ✅ Stomped · ✨ Perfect style · ⚠ Bobble · ✋ Hand drag · 💥 BS2/BS3/Hip · 🤔 Front punch · ❌ Crash · 💀 Full wash. |
| Note | Optional, e.g. “blind take-off, north aspect”. |

3. The Features tab
The Features tab lists every feature on the active line with its type, size, trick, execution and score contribution. Click any feature to edit or delete it.
Module 4 · Read / Anticipate
Set the ruleset & category
Scoring is context-aware. Before you trust the numbers, tell Facecast which competition rules, which category and which conditions you are inspecting under.
Scoring setup
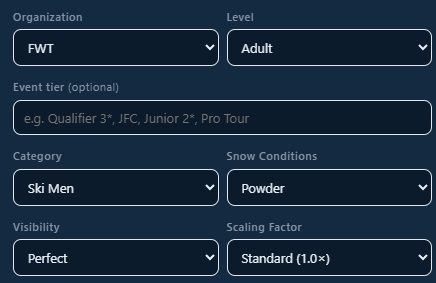
These controls sit in the Inspection tab under Scoring Setup:
| Setting | Options | Why it matters |
|---|---|---|
| Organization | FWT · IFSA | Different judging frameworks. |
| Level | Adult · Junior | Junior rules are stricter on risk. |
| Event Tier | Free text (e.g. Qualifier 3*, JFC, Pro Tour) | Context label for the inspection. |
| Allows inverts | Checkbox | IFSA Region 2 Adult only; off elsewhere. Affects whether inverted airs are legal. |
| Category | Ski Men · Ski Women · Snowboard Men · Snowboard Women | Sets baseline expectations. |
| Snow Conditions | Powder · Crusty · Ice / Hardpack · Heavy Sluff | Harder snow raises consequence. |
| Visibility | Perfect · Flat Light · Fog / Snowing | Poor visibility raises risk. |
| Scaling Factor | Standard (1.0×) · Big Mountain (1.15×) · Small Venue (0.85×) | Scales the whole venue up or down. |
Module 5 · Anticipate
Scoring in depth
Facecast scores each line 0–100 from five criteria, then adjusts it with the line's difficulty, exposure, run completion and a list of modifiers. Here is exactly what moves the number.
The five criteria
The Scenario Sheet tab shows the overall impression score (with a red–yellow–green thermometer) and five live gauges:
Line cyan
The quality and creativity of the path itself.Control green
How in-control the riding looks.Technique yellow
Turn quality and precision.Fluidity purple
Flow and continuity, no stalls.Air & Style red
The airs and how they are ridden.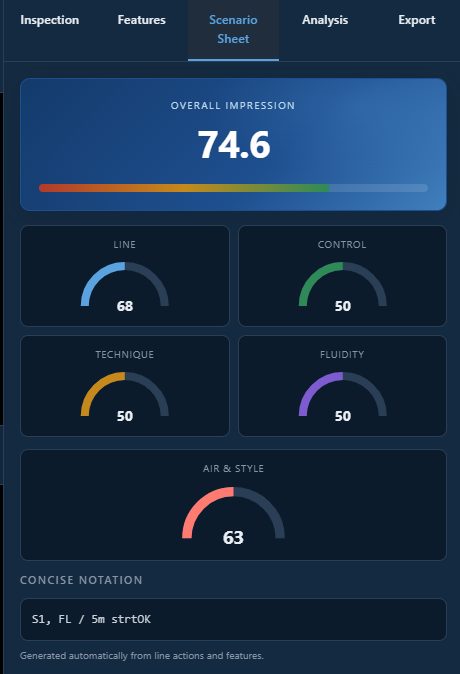
Per-line settings
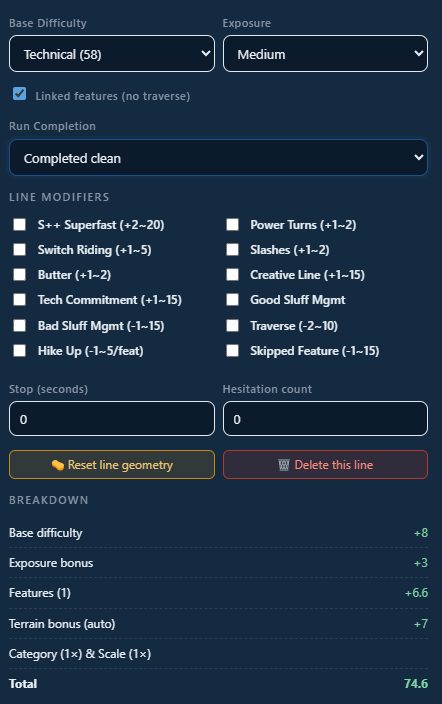
When a line is active, its panel exposes the levers that shape its score:
| Setting | Options / effect |
|---|---|
| Base Difficulty | Standard (50) · Technical (58) · Advanced (65) · Expert (72). |
| Exposure | Low (0) · Medium (+3) · High (+7) · Extreme (+12) risk. |
| Linked features | Checkbox — features ridden consecutively with no traverse between them. |
| Run Completion | Completed clean · Minor bobbles (−3) · Major crash (−15) · DNF (−40). |
Line modifiers
Checkboxes that add or subtract points, plus two numeric inputs. Use them to reflect how the line is actually ridden:
| Bonuses (+) | Penalties (−) |
|---|---|
| S++ Superfast · Power Turns · Switch Riding · Slashes · Butter · Creative Line · Tech Commitment · Good Sluff Mgmt | Bad Sluff Mgmt · Traverse · Hike Up (per feature) · Skipped Feature |
Numeric: Stop (seconds stopped) and Hesitation count — both pull the score down.
The Breakdown
Under the line panel, the Breakdown shows the full calculation: which criteria, which features and which modifiers were applied, ending in the final score. Use it to understand why a line scores what it does, not just the number.
Module 6 · Compare
Compare — scenario analysis
The third verb. Now that you have several scored lines, the Analysis tab stacks them side by side so you can weigh score against risk — not pick the highest number blindly.
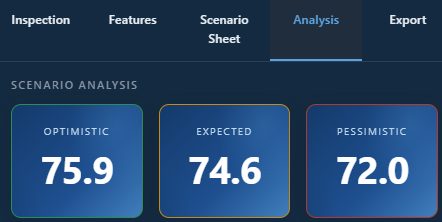
Optimistic, Expected, Pessimistic
For the active line, three outcome boxes show how the run could play out:
🟢 Optimistic
Best-case execution — everything stomped.🟡 Expected
The realistic outcome on the day.🔴 Pessimistic
Worst case — bobbles and crashes priced in.The gap between optimistic and pessimistic is itself information: a wide gap means the line is high-variance.
Risk vs Expected Score
Every line is plotted as a dot on a chart — risk on the horizontal axis, expected score on the vertical. Four quadrants tell you what kind of line each one is:
| Quadrant | Meaning |
|---|---|
| Sweet Spot | High score, low risk — the ideal line. |
| High Risk / High Reward | High score but high risk — the aggressive play. |
| Safe / Conservative | Low risk, lower score — the banker. |
| Danger Zone | High risk, low score — avoid. |
Risk is built from exposure, crash penalties, blind spots and the number of features. A line can be exciting on score yet sit in the Danger Zone — that is exactly the kind of thing this view is meant to surface.
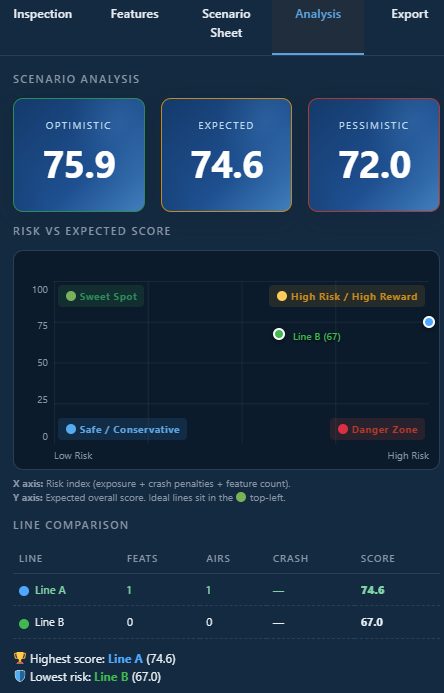
Line comparison table & recommendation
Below the chart, a table lists every line with its score and each of the five criteria plus a risk index, so you can sort and compare at a glance. Facecast then writes a short recommendation highlighting the highest-scoring line, the safest line and the best balance — as input to your decision, never as the decision itself.
Module 7 · Commit · Pro for cloud & sharing
Commit — save & share
The fourth verb. Lock the inspection in: save it locally or to the cloud, reopen it from My Venues, and — on Pro — share it with other riders for review or collaboration.
Save locally (Pro)
💾 Save downloads the inspection as a .json file to your device; 📂 Load opens one back up. It needs no connection, but the file lives only on your machine.
Save online (Pro / Coach, or active trial)
- Click ☁️ Save Online. The inspection is stored on the server and counts against your quota (Free: 1; Pro: unlimited).
- A status message confirms “Inspection saved online.”
- While you edit, Facecast holds an edit lock and refreshes it every 30 seconds so two people never overwrite each other.
Reopen saved inspections from 🗃️ My Venues — search by name or owner, then open or delete.
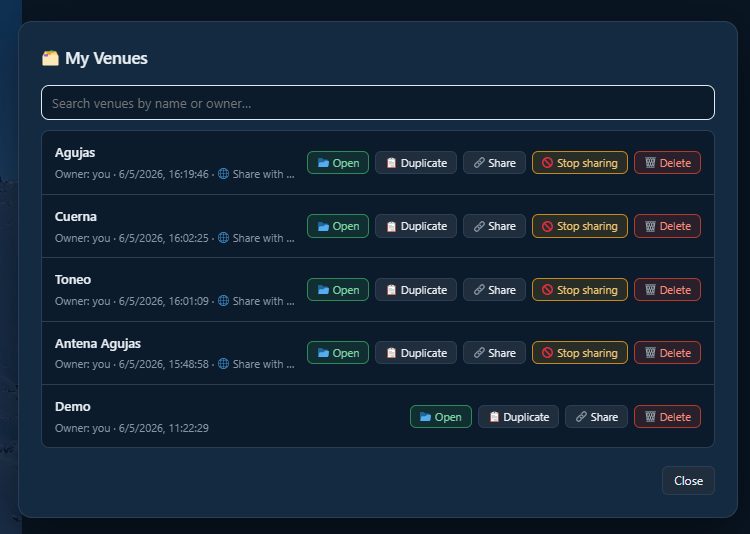
Share an inspection (Pro)
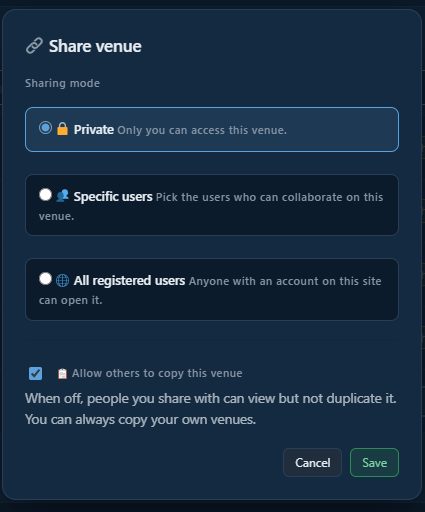
After a cloud save, 🔗 Share opens the Share venue dialog with three modes:
| Mode | Who can open it |
|---|---|
| 🔒 Private | Only you (default). |
| 👥 Specific users | Riders you search and add by name or email. Each gets ✏️ Read & write or 👁 Read only. |
| 🌐 All registered users | Anyone with an account on the site, as Read & write or Read only. |
The 📋 Allow others to copy this venue checkbox decides whether viewers can duplicate it. When off, they can look but not copy.
Collaborative editing & locks
If you open a shared inspection that someone else is editing, you see a read-only banner: “Read only — another rider is editing this inspection”, with who is editing. You can request the edit lock with ✏️ Edit, or 🔓 Force unlock if they have stepped away. To manage or stop sharing, reopen the Share dialog — “Stop sharing” removes everyone's access.
.json save and copy controls are Pro features. On Free you can still save one inspection online.Module 8 · Pro
Publish a public venue page
Turn a finished inspection into a public, search-indexed page that anyone can read — a clean way to share your read of a face with the wider community.
Publish
- With the inspection cloud-saved, click Publish inspection (📤). Available only if your plan includes public publishing (Pro).
- Confirm at the prompt: “Publish this inspection as a public, indexable page?”
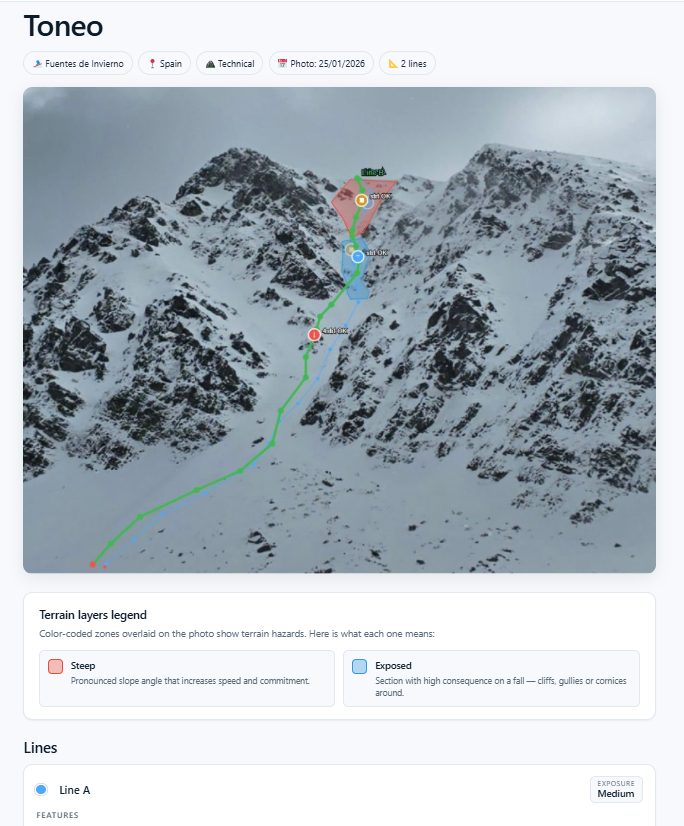
- Facecast builds the page: it composites the face photo with your annotations and lines into a featured image, assigns the resort, difficulty, category and country, and publishes it. You will see “Inspection published.”

What the public page shows
- The venue name, the resort / country / difficulty links, the photo date and the line count.
- The composite image of the face with the lines drawn on it.
- A terrain legend explaining each hazard type.
- The line details and scoring breakdown, plus you as the author with a link to your profile.
- A clean canonical address of the form
/venue/your-venue-slug/.
Update or unpublish
After publishing, the button becomes Update public version, and a View public page link appears. To take it down, choose Unpublish and confirm “Remove the public page for this inspection?” — the page goes dark but your inspection is preserved, so you can re-publish later.
Module 9 · Pro for PDF/JSON
Export your inspection
The Export tab turns an inspection into something you can keep, print or paste elsewhere.
| Export | What you get | Plan |
|---|---|---|
| 💾 Save Inspection (.json) | The full inspection as a file, to reload later or hand to another rider. | Pro |
| 📄 Export PDF Report | A printable report of the face, lines and scores, rendered server-side. | Pro |
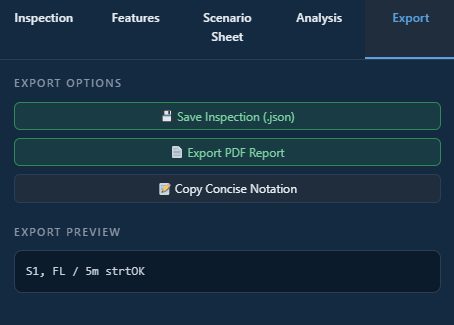
| 📝 Copy Concise Notation | A compact text shorthand of the run, copied to your clipboard. | Any |
Concise notation
The notation is a short, human-readable summary of a line — its features, tricks and execution in a compact form. It is handy for pasting into a chat, a coach's notes or a spreadsheet without exporting a whole file. A live preview sits next to the button so you can see it before copying.
Module 10 · Riders
Your rider profile
A rider profile is your public page in the rider directory. Any logged-in rider can create one; publishing puts you in the directory and on the home grid.
Where to edit it
Open the Rider profile page at https://facecast.online/my-rider-profile/. If you are not logged in you are prompted to sign in first.
Fields
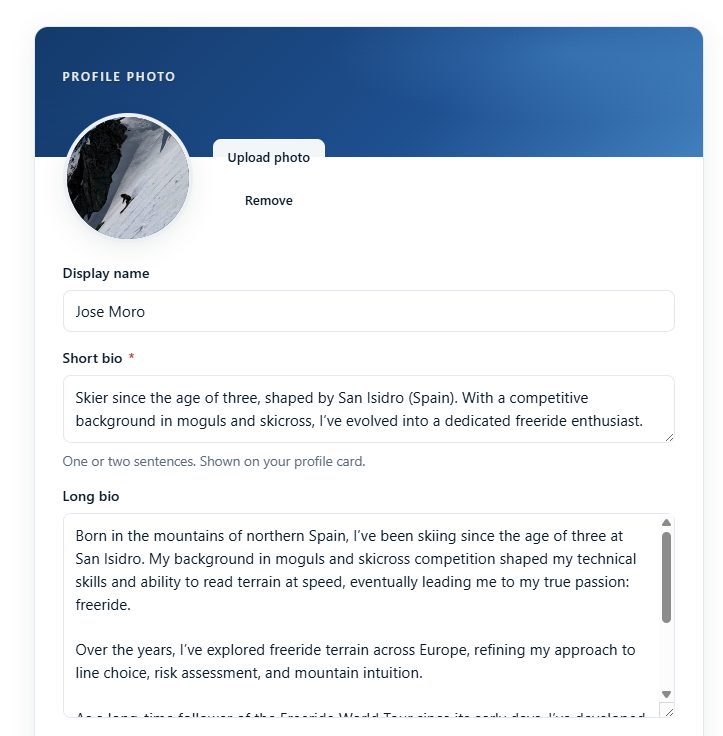
| Field | Notes |
|---|---|
| Profile photo | Upload, preview, or remove. |
| Display name | Up to 120 characters. |
| Short bio * | One or two sentences for your card (max 240). Required to publish. |
| Long bio | The full text on your page. |
| Years of experience | 0–80. |
| Home resort | e.g. Baqueira-Beret. |
| Discipline * | Ski, Snowboard or Both — pick one. Required to publish. |
| Sponsors | Add as many as you like. |
| Languages / Countries / Ski resorts | From the shared lists. |
| Public contact | Email, website, Instagram, YouTube, TikTok, WhatsApp — all optional; only what you fill in shows. |
| Achievements | One per line, e.g. FWQ4* Baqueira 2024, podium at… |
Save, publish, unpublish
- Save draft keeps your work private.
- Publish puts you in the directory. If the short bio or discipline is missing you will see: “Fill in your short bio and choose a discipline before publishing.”
- Unpublish returns the profile to draft. View public page opens your live profile.
A banner at the top shows your plan status — e.g. “You are on the Free plan” with an Upgrade to Pro link, or your Pro end date.
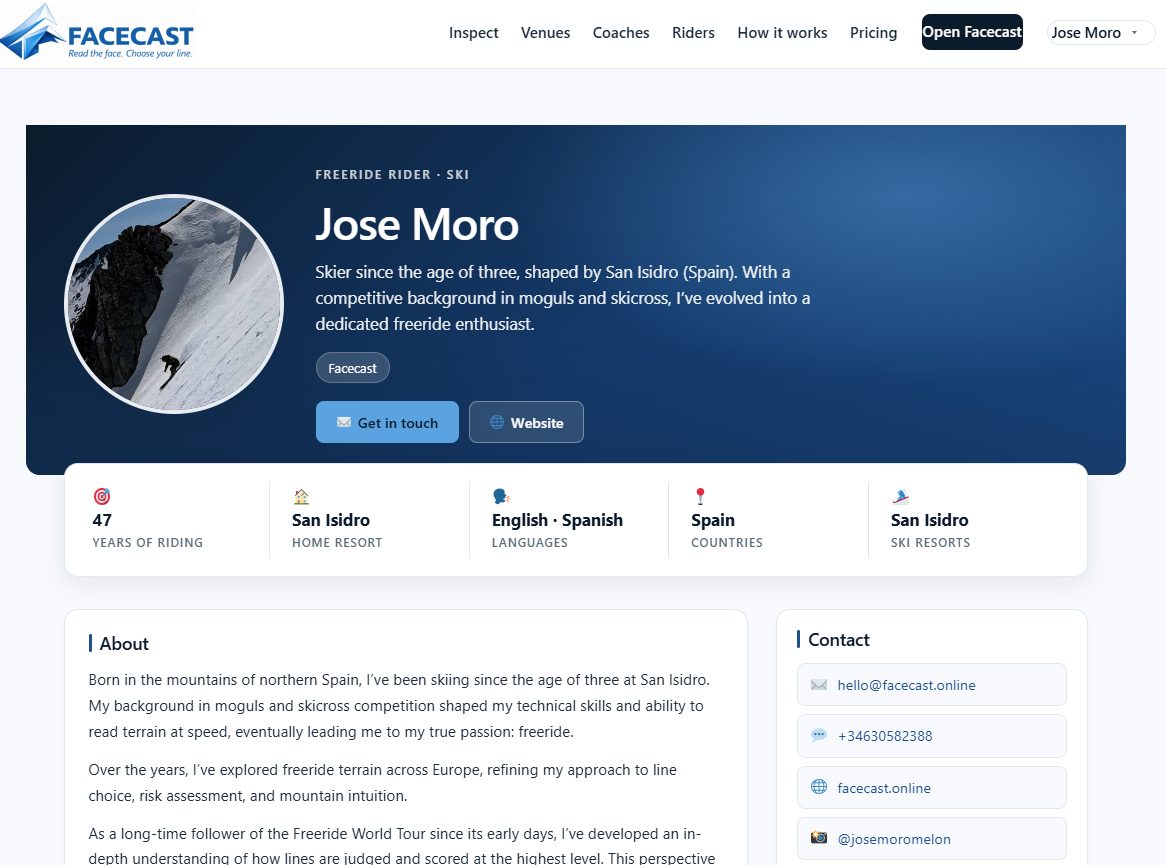
Riders are found through the rider directory at https://facecast.online/riders/. Fill in disciplines and resorts so the filters can surface you.
Module 11 · Coach
Your coach profile
A coach profile is your public listing in the coach directory — the place riders find a guide who reads big-mountain faces. It needs an active Coach subscription.
Access
Open the Coach profile page at https://facecast.online/my-coach-profile/. You will see one of three states: a prompt to log in; a prompt that a “Coach subscription required” if you are logged in without one; or the full editor if you are a Coach.
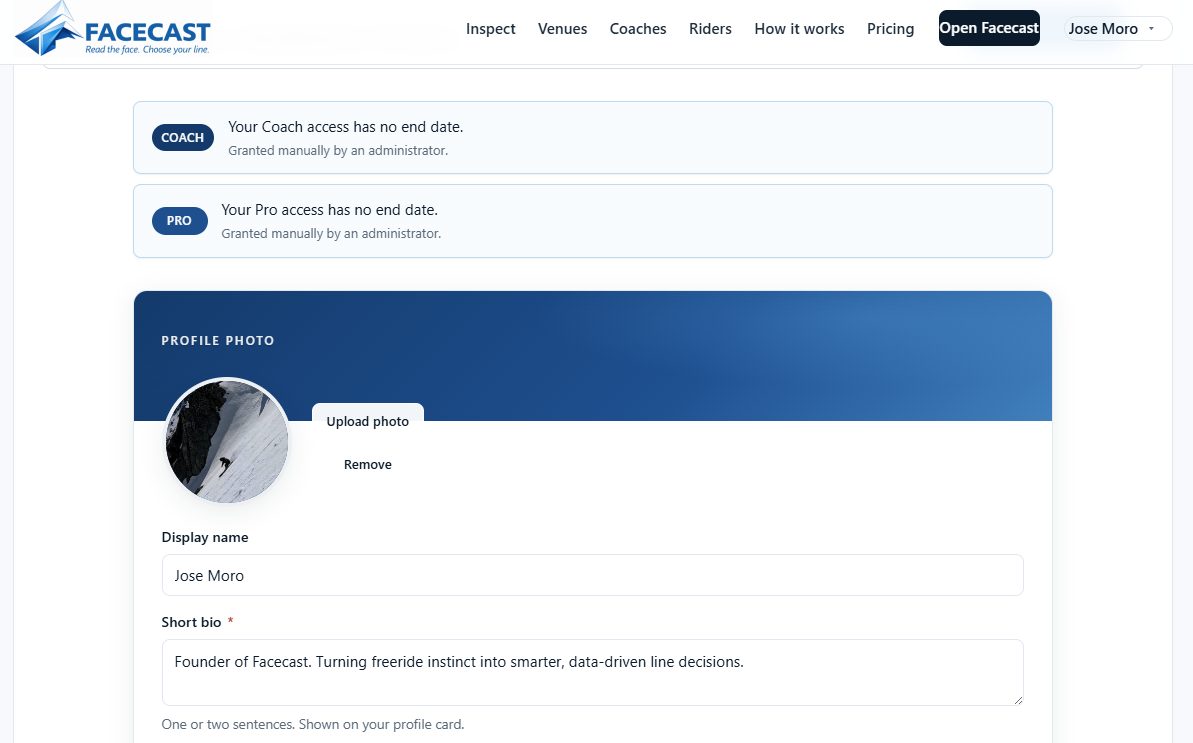
Fields
| Field | Notes |
|---|---|
| Profile photo | Upload, preview, remove. |
| Display name | Up to 120 characters. |
| Short bio * | One or two sentences for your card (max 240). Required to publish. |
| Long bio | Full profile page text. |
| Years of experience | 0–80. |
| Rate hint | e.g. from 80 €/h. |
| Specialties * | At least one. Required to publish. |
| Languages / Countries / Ski resorts | Countries and resorts can be derived from the venues you publish. |
| Public contact | Email, website, Instagram, YouTube, TikTok, WhatsApp — optional. |
| Certifications | One per line, e.g. Avalanche 2 (AIARE), UIAGM aspirant… |
Save, publish, unpublish
Same controls as a rider profile: Save draft, Publish (blocked with “Fill in your short bio and at least one specialty before publishing” if incomplete), Unpublish, and View public page. A subscription banner shows when your Coach access ends and whether it was billed via PayPal or granted by an administrator.
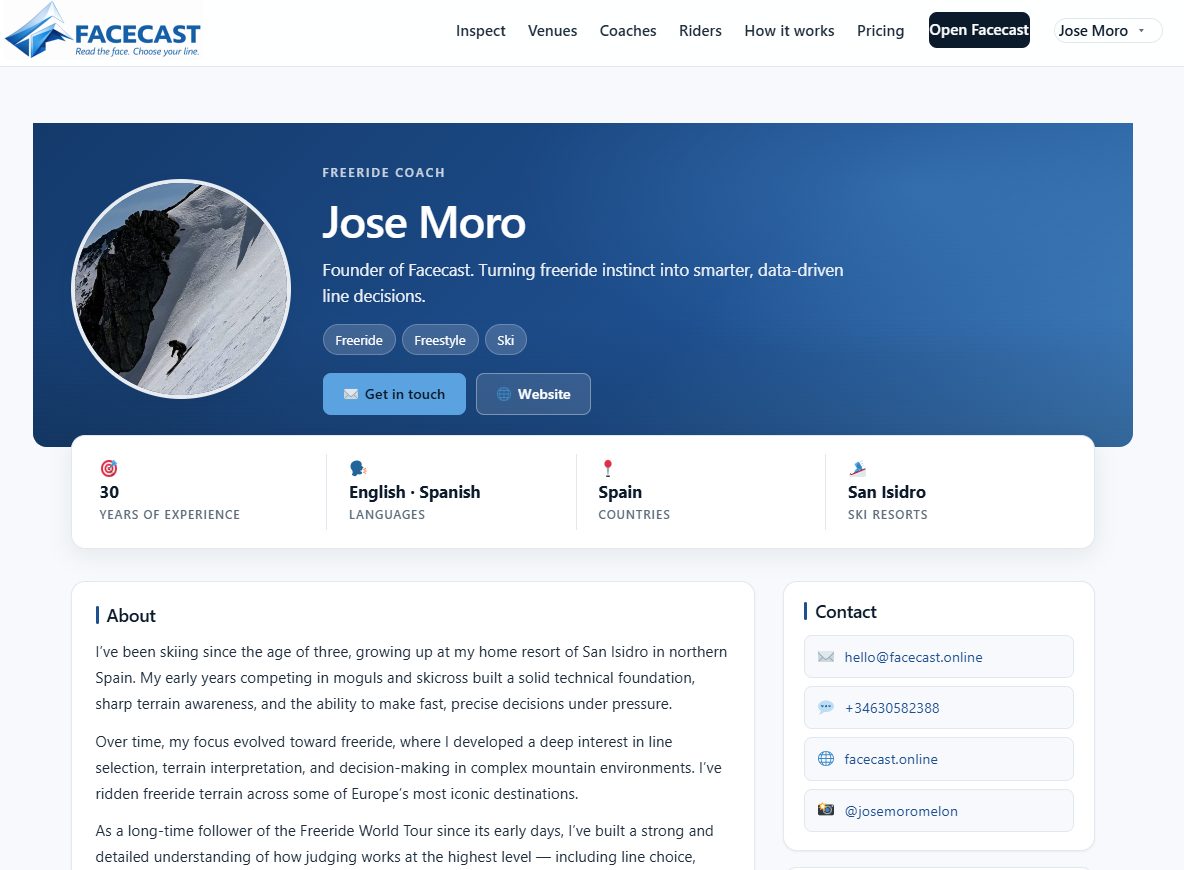
Your public coach page & the directory
The public page shows your photo, bios, specialties, languages, certifications, the contact fields you filled in, and the most recent venues you have published — from which Facecast derives where you coach. Riders reach you through the public coach directory.
Module 12 · Coach & Riders
Promo codes & trials
Coaches can hand riders a Pro trial with a promo code. Riders redeem it on the redeem page. There is also an optional automatic trial on a rider's first venue.
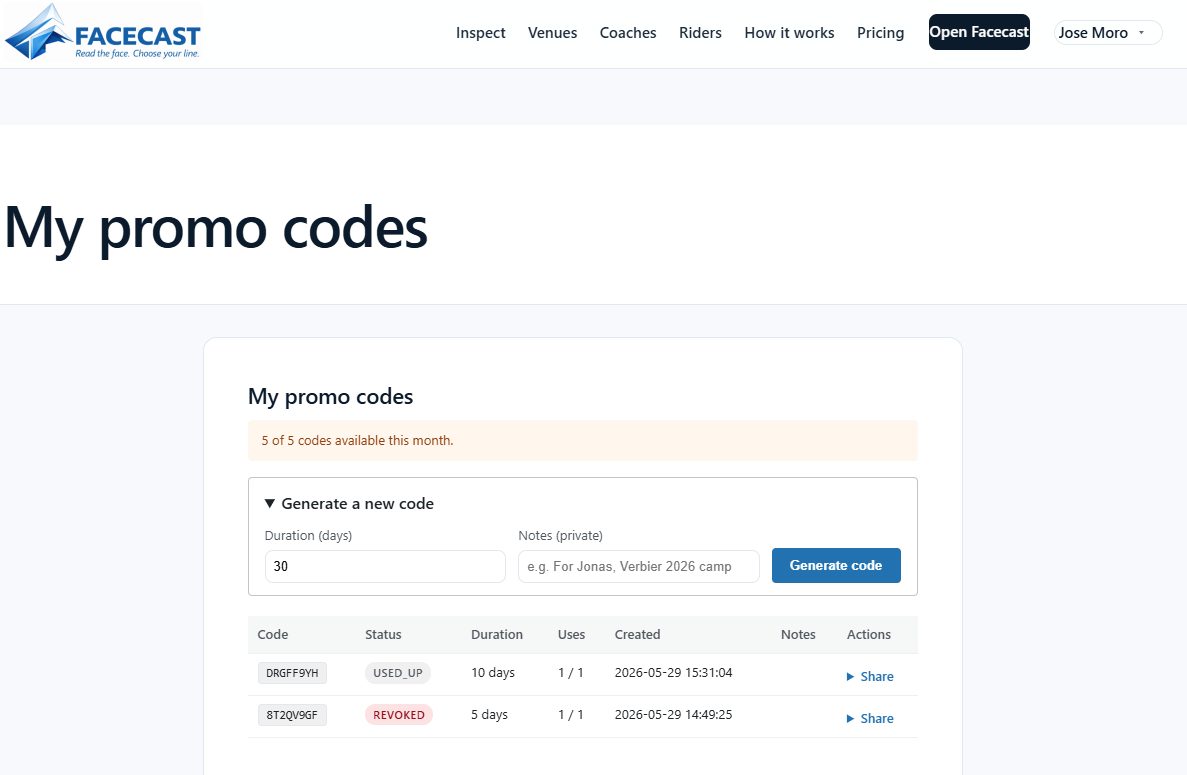
For coaches: generate & share codes
- From the coach profile editor, generate a code, view redemptions, revoke, or email it to a rider.
- You have a monthly quota (default 10). Each redeemed code grants the rider a Pro trial for a set number of days (default 30).
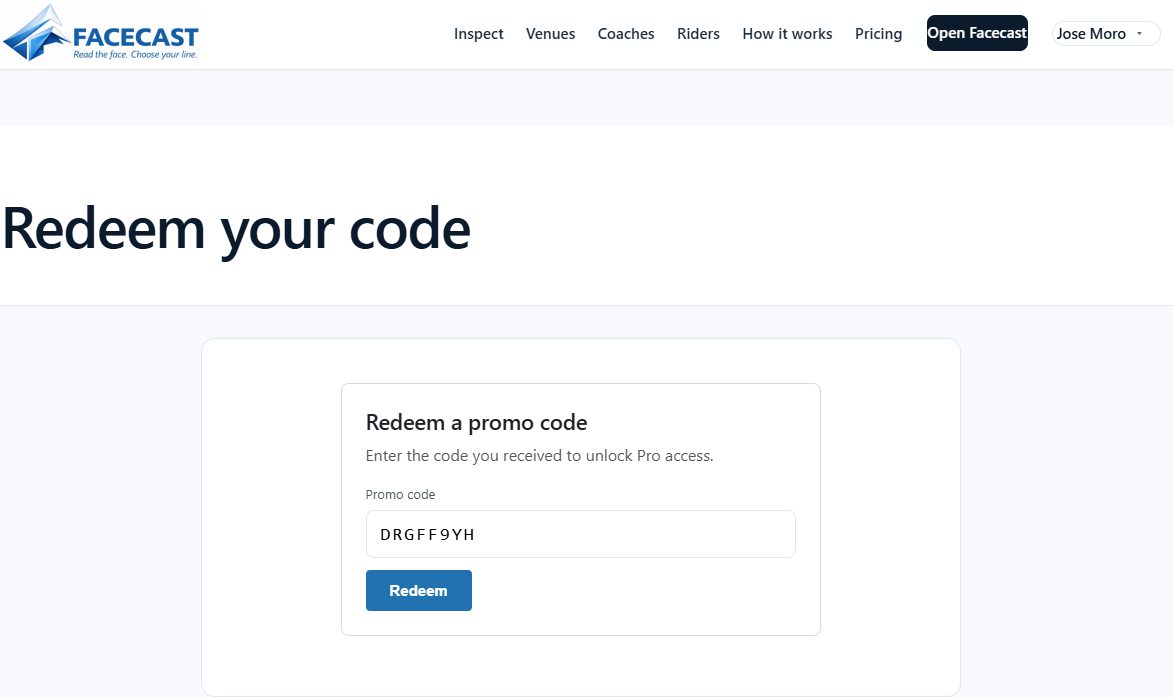
For riders: redeem a code
- Go to the redeem page. You must be logged in.
- Enter the code and submit.
- On success: “Code redeemed! Pro access granted until [date].” You are taken to your rider page.
A code is rejected if it is already used, expired, or does not match your account — ask your coach for a fresh one.
Automatic first-venue trial
If the administrator has enabled it, creating your very first venue grants a Pro trial automatically for a configured number of days. It is granted once per account.
Module 13 · Pro Coach
Subscriptions & payment
Pro and Coach access is billed through PayPal subscriptions. Here is how a rider or coach subscribes, and how access is tracked.
Subscribe
- Go to the subscribe page — Pro or Coach.
- Click the PayPal subscribe button and complete checkout in PayPal.
- When PayPal confirms the subscription is active, Facecast grants your access automatically — your plan badge and quota update.
How access is tracked
- Your profile banner shows when access ends and the source: “Billed via PayPal” or “Granted manually by an administrator.”
- If a subscription is cancelled, expires or is suspended, access is revoked. For coaches, the public profile auto-unpublishes.
- An administrator can also grant Pro or Coach manually, with an optional end date — useful for comps, sponsorships or support.
Module 15 · Reference
Reference
A quick-reference glossary and the site pages.
Glossary
| Term | Meaning |
|---|---|
| Venue | One big-mountain face inspection (photo + markings + lines). |
| Line | A riding path from drop-in to runout. |
| Feature | A cliff, mandatory air, pillow, couloir or technical section on a line. |
| Terrain layer | A hazard zone: Steep, Exposed, No Fall, Ice Balls, Sluff. |
| Blind spot | Face you cannot see from below before dropping in. |
| Exposure | Consequence of a fall: Low / Medium / High / Extreme. |
| Execution | How cleanly a feature is ridden (Stomped … Full wash). |
| Run completion | Outcome of the whole run (Clean … DNF). |
| RACC | Read · Anticipate · Compare · Commit — the method. |
Pages
| Page | What it’s for |
|---|---|
| Inspect (editor) | Inspect a face and build a venue. |
| Rider profile | Create and publish your rider profile. |
| Rider directory | Find and filter riders. |
| Coach profile | Create and publish your coach profile. |
| Coach directory | Find and filter coaches. |
| Venue directory | Browse published venues. |
| Subscribe (Pro / Coach) | Start a Pro or Coach subscription. |
| Redeem a code | Enter a promo code for a Pro trial. |
| Pricing | Plans, prices and what each plan includes. |
Facecast User Course